
In the world of oil painting, where color often steals the spotlight, the true secret to creating captivating, professional-grade artwork lies beneath the surface—in the underpainting. If you've ever struggled with paintings that turn out muddy, flat, or lacking in depth, the issue may not be your palette choices but rather the foundation you're building upon. Subtractive underpainting, a technique that involves applying a base layer of paint and then selectively removing it to reveal highlights and establish values, offers a transformative approach. This method, praised for its simplicity and effectiveness, empowers artists of all levels to achieve luminous results with greater ease and confidence. As highlighted in various art resources, mastering this technique isn't just about improving your paintings; it's about reshaping how you perceive and construct visual narratives on canvas.

Subtractive underpainting stands out in the broader category of underpainting methods, which include monochromatic, two-color, and even full-color approaches. Unlike additive techniques where you build up layers from light to dark, subtractive underpainting starts with a mid-tone or dark base and subtracts paint to create lighter areas. This "wiping out" process mimics the way sculptors chisel away stone to reveal form, hence the term "subtractive." It's particularly suited to oil paints due to their slow drying time, allowing for extended manipulation. Artists like those at the Milan Art Institute emphasize its beginner-friendly nature, noting that it simplifies decision-making early in the painting process by focusing on value relationships— the relative lightness or darkness of tones—before diving into complex color harmonies.
The history of underpainting traces back to the Renaissance and Baroque eras, where masters such as Rembrandt and Johannes Vermeer employed similar foundational layers to structure their compositions. In the Baroque period, this was often referred to as "dead-coloring," a monochromatic underpainting stage that mapped out light, shadow, and form before adding vibrant glazes. Vermeer's technique, for instance, involved a neutral underpainting to guide the placement of figures and objects, ensuring a cohesive structure that enhanced the final luminosity. Rembrandt frequently used warm brown tones like burnt umber for his underpaintings, subtracting to create dramatic chiaroscuro effects that gave his portraits an unparalleled sense of depth and realism. This approach wasn't merely preparatory; it was integral to the Old Masters' success, allowing them to overcome the intimidation of a blank canvas and build paintings with enduring vibrancy.
In modern practice, subtractive underpainting has evolved but retains its core principles. It begins with toning the canvas—a light wash of color to eliminate the stark white surface, which can distort value judgments. Common tones include warm earth colors like burnt sienna or raw umber, which provide a neutral ground that enhances the warmth or coolness of subsequent layers. Once toned, the artist applies a thin, even layer of paint over the composition sketch. Using tools like brushes, rags, or specialized wipe-out implements, they then subtract paint to reveal the lighter values underneath, creating a monochromatic map of lights and darks. This stage is crucial for establishing the painting's overall mood: a warm underpainting can infuse the work with energy and heat, while a cool one might evoke serenity or coldness.

The benefits of this technique are manifold, making it indispensable for both novices and seasoned artists. First and foremost, it prevents the common pitfalls of overworking colors, which often leads to muddy mixtures. By locking in values early, you create a strong structural foundation that guides the rest of the painting, reducing guesswork and allowing for more intuitive color application later. This results in enhanced luminosity, as the translucent glazes applied over the underpainting allow light to penetrate and reflect back through the layers, mimicking the glow seen in masterpieces by the Old Masters. Additionally, subtractive underpainting promotes efficiency: errors in value can be easily corrected by wiping and reapplying, without the need to repaint entire sections. It also encourages a deeper understanding of light and shadow, training the eye to prioritize form over hue, which ultimately elevates the emotional impact of the artwork.
To master subtractive underpainting, follow these detailed steps, adaptable to your style and subject matter:
- Prepare Your Canvas: Start with a primed canvas or panel. Apply a thin tone using diluted oil paint (mixed with odorless mineral spirits) in a color like burnt sienna. Let it dry to the touch, which may take a few hours or overnight.
- Sketch the Composition: Lightly draw your subject using charcoal or a thin brush with diluted paint. Focus on major shapes and lines, avoiding fine details.
- Apply the Base Layer: Using a large brush, cover the canvas with a mid-value monochromatic paint, such as a mixture of ultramarine blue and burnt umber for a neutral tone. Keep it thin and even.
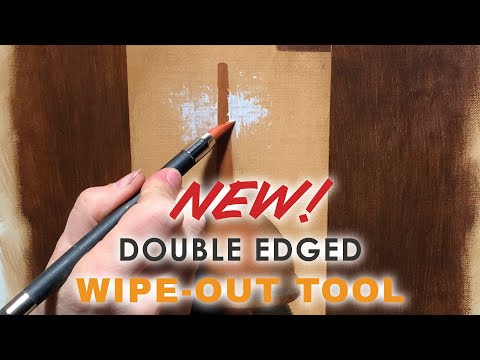
- Subtract for Highlights: While the paint is still wet, use a subtraction tool, soft cloth, or even a rubber-tipped color shaper to wipe away paint in areas that will be highlights. This reveals the lighter toned ground beneath, creating instant contrast and depth.
- Refine Values: Build darker areas by adding more paint where needed, and continue subtracting for mid-tones. Aim for a full range of values from light to dark.
- Dry and Layer: Allow the underpainting to dry completely (1-2 days). Then, apply opaque or semi-transparent colors over it, letting the underpainting influence the final hues for added harmony.
- Glaze for Luminosity: Finish with thin glazes of transparent colors to enhance vibrancy, ensuring the underpainting's values shine through.

Essential tools include high-quality oil paints that blend smoothly, such as those with rich pigmentation for easy subtraction. A custom wipe-out tool, often featuring a pointed rubber tip, provides precision for fine details like edges and textures. Brands like Trekell offer specialized versions that mimic erasers but work on wet paint.
Pair these with odorless solvents for safe thinning and cleaning.
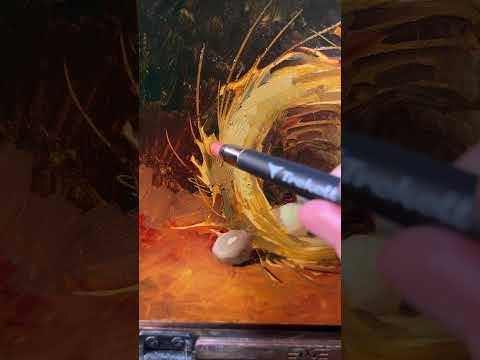
Real-world examples illustrate the power of this technique. Consider how contemporary landscape artists use warm subtractive underpaintings to capture the golden hour's glow, as seen in side-by-side comparisons where the initial wiped layer sets a fiery tone that permeates the finished piece.
Or, in portraiture, subtracting to define facial highlights creates a lifelike dimensionality that additive methods might muddle.
Ultimately, embracing subtractive underpainting transforms your artistic practice, fostering confidence and producing works with professional polish. Whether you're a hobbyist or aspiring pro, this technique demystifies the path to depth and luminosity, proving that great art starts not with bold strokes, but with thoughtful subtraction.
FAQ
What is subtractive underpainting?
Subtractive underpainting is a technique in oil painting where an artist applies a base layer of paint and then removes portions to create highlights and establish value relationships, building a strong foundation for the final artwork.
Why should artists use subtractive underpainting?
It prevents muddy colors, enhances luminosity, allows easy corrections, and simplifies the painting process by focusing on values first, leading to more professional and depth-filled results.
What are the basic steps for subtractive underpainting?
Prepare and tone the canvas, sketch the composition, apply a monochromatic base layer, subtract paint for highlights using tools, refine values, let dry, and then add color layers and glazes.
What tools do I need for subtractive underpainting?
Essential tools include oil paints, brushes, odorless mineral spirits, soft cloths or rags, and a specialized wipe-out tool for precise subtraction.
Is subtractive underpainting suitable for beginners?
Yes, it's beginner-friendly as it simplifies decision-making, focuses on fundamentals like value, and allows for forgiving adjustments without ruining the canvas.
How does subtractive underpainting differ from other underpainting methods?
Unlike additive methods that build from light to dark, subtractive starts with a darker base and removes paint for lights, offering quicker establishment of contrast and easier error correction.
Can subtractive underpainting be used in acrylics or other media?
While optimized for oils due to their wet-working time, similar subtractive principles can apply to acrylics with fast-drying mediums, though adjustments for speed are needed.
0 comments